


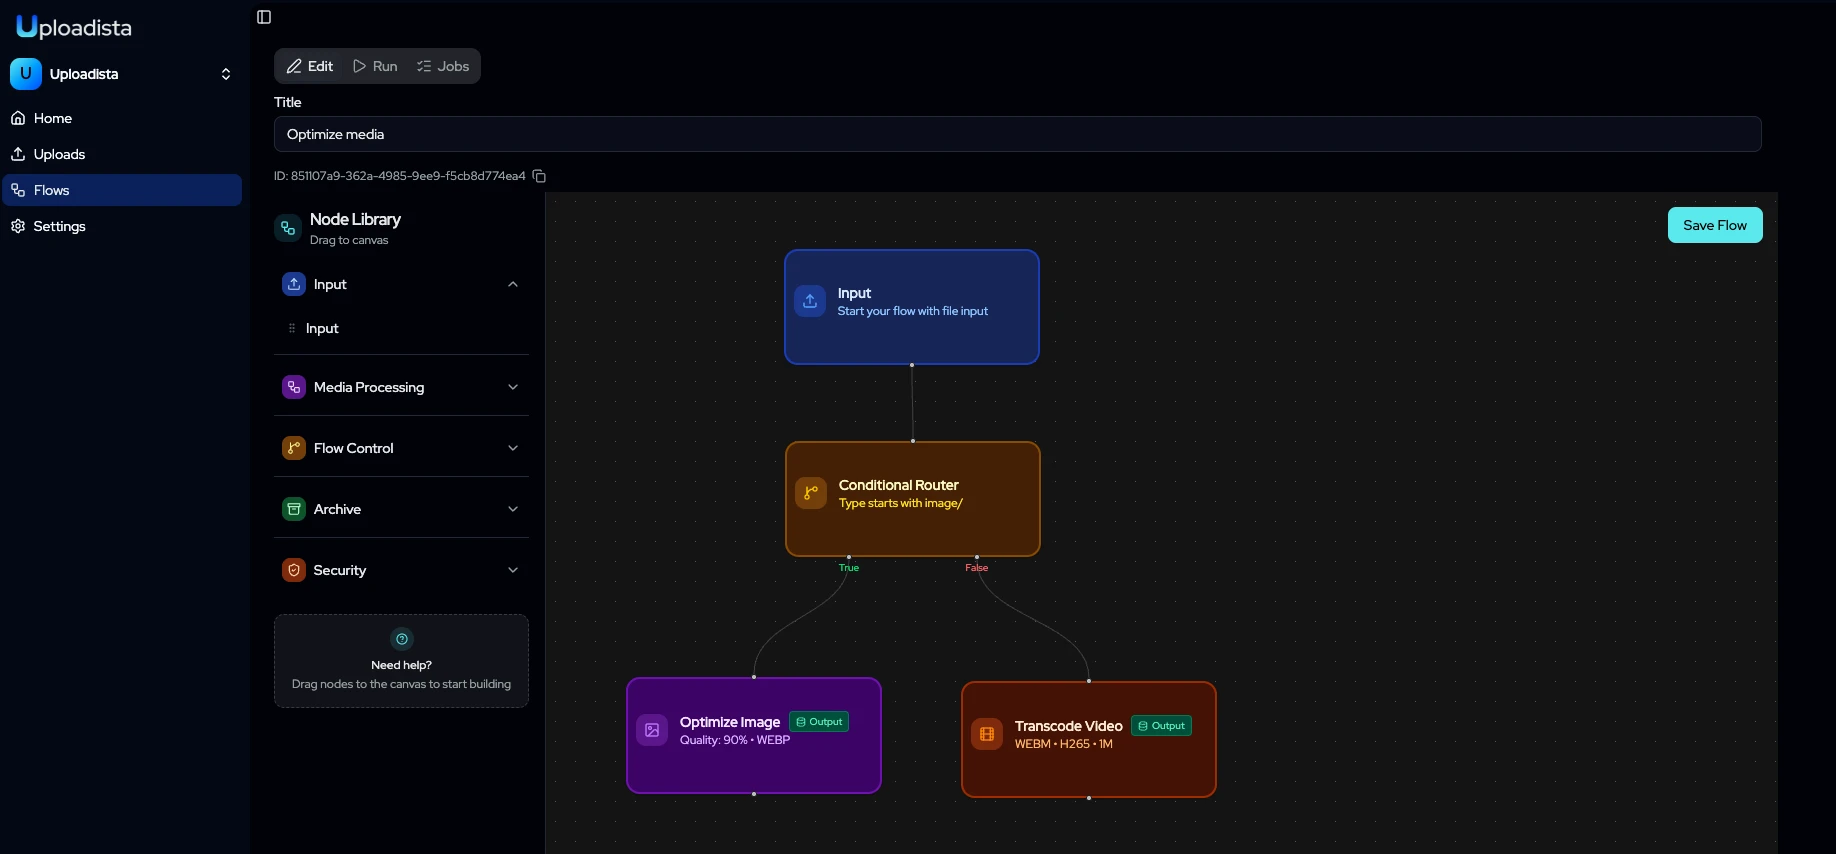
Every file processing pipeline starts life as a drawing.
Someone sketches it on a whiteboard: a box for the upload, an arrow to the virus scanner, a fork for images and PDFs, two arrows into storage. Everyone in the room nods. Then the drawing gets erased, and the next three weeks are spent translating it into queue workers, Lambda handlers, and retry logic scattered across six files. Six months later, nobody can answer “what actually happens when a user uploads a PDF?” without reading the code.
The visual flow builder in Uploadista Cloud closes that gap. The drawing is the pipeline.
The canvas
Open a flow in the dashboard and you get a canvas with a node library on the left. Drag a node onto the canvas, drop it where you want it, drag a connection from one node’s output handle to the next node’s input. That’s the whole interaction model.
The library is organized by what nodes actually do:
- Input — where files enter the flow, either as a file stream from a client or from a URL.
- Media Processing — grouped into Image (resize, transform, optimize, remove background, describe), Video (transcode, resize, trim, generate thumbnail, describe), and Document (OCR, extract text, split PDF, merge PDFs, describe, convert to Markdown).
- Flow Control — multiplex to fan a file out to several branches, merge to bring branches back together, a conditional router to send files down different paths, and passthrough when you want a file to continue untouched.
- Archive — zip files into a compressed bundle.
- Security — virus and malware scanning with ClamAV.
Nodes that involve AI — background removal, image and video description, OCR — sit right next to the deterministic ones. From the canvas’s point of view there’s no difference: a node takes files in and puts files out.
A real pipeline, in about two minutes
Here’s a flow I built while writing this post. A user uploads a document or a photo to a support ticket:
- Input receives the file.
- Scan Virus checks it. Nothing downstream runs on an infected file.
- Conditional Router looks at the file’s type. Images go one way, PDFs the other.
- On the image branch, a Multiplex node copies the file into two paths: Resize to a 400×400 avatar-style thumbnail, and Optimize to a WebP web version at quality 80.
- On the PDF branch, OCR extracts the text, then Convert to Markdown produces something searchable.
Five minutes of dragging, and the pipeline is not just documented — it runs.
The conditional router is worth a closer look, because it’s where most branching logic lives. You pick a field (type, size, width, height, or extension), an operator (=, ≠, >, <, contains, starts with), and a value. “Type = Images” sends every image/* file down the true branch. No expression language to learn, no regex to get wrong at 2 AM.
Configuring nodes without reading docs
Click a node and a configuration panel opens beside the canvas. Each node type gets a panel built for it: the resize node asks for dimensions and a fit mode, the transcode node asks for format and codec, the split PDF node asks for page ranges. The options are the same ones the SDK exposes — they’re just presented as form fields instead of an object literal you have to remember the shape of.
Two options show up on most nodes and are worth understanding:
File naming. Auto mode appends a node-specific suffix, so photo.jpg becomes photo-800x600.jpg after a resize. Or you take control and define your own pattern.
Keep output. Off by default: the node’s output is stored but not returned in the flow result, which keeps memory use low. Turn it on when you want the bytes back — to chain them, or just to look at them.
There’s one convention that saves a lot of wiring: any node with no outgoing connection is a sink, and its output is automatically persisted to your target storage. You don’t have to drag a storage node onto the end of every branch. Leave a branch open and its result gets saved. Wire it onward and it keeps processing.
Test before you ship
A pipeline you can see is useful. A pipeline you can run before deploying it is the actual point.
The builder has a test panel. Drop a real file into the input node and the flow executes for real — same engine, same nodes, same storage. Progress streams back over WebSockets: the upload bar fills, then each node lights up as it becomes the active step, and you watch the file move through the graph. When it finishes you get the outputs, with previews for images, OCR text, and AI descriptions.
If something fails, it fails on a specific node, in front of you, with the error attached to that node — not buried in a log stream from a function you have to go find.
From canvas to production
When the flow does what you want, save and activate it. It gets a flow ID, and that ID is the entire integration surface:
import { Flow } from "@uploadista/react";

function TicketAttachment() {
  return (
    <Flow
      flowId="support-attachment"
      storageId="your-storage-id"
      onSuccess={(outputs) => attachToTicket(outputs)}
    >
      <Flow.DropZone accept="image/*,application/pdf">
        {({ isDragging, getRootProps, getInputProps }) => (
          <div {...getRootProps()}>
            <input {...getInputProps()} />
            {isDragging ? "Drop your file" : "Click or drag to upload"}
          </div>
        )}
      </Flow.DropZone>

      <Flow.Status>
        {({ status, currentNodeName }) => (
          <p>{status === "processing" ? `Processing: ${currentNodeName}` : status}</p>
        )}
      </Flow.Status>
    </Flow>
  );
}
Note currentNodeName. The node names you typed on the canvas come back to your UI at runtime, so “Scanning for viruses” and “Extracting text” are strings you can show a user instead of a generic spinner.
Changing the pipeline later doesn’t touch this code. Add a node, re-test, save — the flow ID is stable and your application keeps calling the same thing.
Visual and code are the same graph
This is the part I care most about, and the part that makes the builder more than a toy.
The canvas isn’t generating a black box. A flow is a directed graph of typed nodes and edges, and that’s exactly what the open-source SDK’s createFlow produces:
export const resizeFlow = createFlow({
  flowId: "resize-image",
  name: "Resize Image",
  nodes: {
    input: createInputNode("input"),
    resize: createResizeNode("resize", { width: 800, height: 600, fit: "cover" }),
    optimize: createOptimizeNode("optimize", { quality: 85 }),
  },
  edges: [
    { source: "input", target: "resize" },
    { source: "resize", target: "optimize" },
  ],
});
Nodes, edges, config. The same three things you drag around on the canvas. The builder is a different editor for the same model, not a different system.
That means you’re not choosing a side. Prototype visually because it’s faster to think that way, then keep the flow in the dashboard where a non-engineer can read it. Or define flows in TypeScript, check them into git, and get compile-time validation on every pipeline definition. Teams I’ve talked to end up doing both: the visual builder for exploring and for the pipelines that change often, code for the ones that are load-bearing and need to move through code review.
And whichever way you build it, the runtime is the same — the flow engine handles orchestration, per-node retries, streaming for large files, and progress events. When step 3 of 5 fails, step 3 is what reruns.
What “without code” actually means
I want to be precise here, because “no-code” is an overloaded promise.
You still write code to trigger a flow. You still write code to do something with the results. What the builder removes is the orchestration layer — the queue plumbing, the step sequencing, the retry bookkeeping, the “which service owns this transformation” archaeology. That layer is where most of the complexity in file processing lives, and it’s the layer that has almost nothing to do with your product.
The pipeline becomes a thing you can look at. A designer can open it and understand it. A support engineer can check what happens to a PDF without asking a backend developer. And the answer to “what happens when a user uploads a file?” is a picture that’s guaranteed to be accurate, because it’s the thing that runs.
Try it
The visual builder is live in Uploadista Cloud today. Sign up — no credit card required — connect a storage bucket, and build your first flow. The documentation covers every node and its options, and the engine underneath is MIT-licensed and on GitHub if you’d rather define your flows in TypeScript.
If you build something interesting on the canvas, show me. The node library grows based on what people are trying to do with it.